
Table of contents
Conversions – are users’ actions on your website that are meaningful for your business.
We can split all the conversions into two sub-types: micro-conversions and macro-conversions.
Macro-conversions – some sufficient events, for example:
- Email subscription
- Phone link click
- Contact form submission;
- Purchase
- Booking(flight, hotel room, etc.)
- Blog page read
Micro-conversions – actions that users take on their way to the “big” conversions:
- Outgoing link clicks
- Contact Page viewed
- Add-to-cart button clicked
- Video viewed
Differences with Universal Analytics
There are some differences between Universal Analytics and Google Analytics 4 Conversions tracking.
Difference 1: naming.
In Universal Analytics, we have Goals.
But in Google Analytics 4 Goals were renamed into Conversions.
In my opinion, the new naming is more transparent as a question “What are our goals?” may have several meanings in conversations with your clients or colleagues(true story!🙂)
Difference 2: types of conversions.
In Universal Analytics, there are four types of Goals:
- Destination(Page viewed)
- Duration
- Pages/Screens per Session
- Event
In Google Analytics 4, you can use events only as conversions, but… Actually, it is not a problem!
As in GA4, even Pageviews are tracked as events automatically.
How to configure conversions in Google Analytics 4
The process depends on the type of action(event) you need to use as a conversion.
For some of them, you already have built-in tracking in Google Analytics 4:
- Page view(event name: page_view)
- Scrolls(scroll)
- Outbound clicks(click)
- Site Search(view_search_results)
- Video engagement(video_start, video_progress, video_complete)
- File downloads(file_download)
For some of these “Enhanced Measurement” events, you need to enable tracking in GA4 Admin Panel, but this literally requires a few clicks).
For some events, you’d need to set up custom events tracking first(using JavaScript-code or Google Tag Manager), and only after that configure conversions.
Below are few examples which you can customize for your unique situation.
Example 1: marking existing events as Conversions
Step 1: Click the “Configure” at the left menu in the GA4 interface
Step 2: Click on the “Events” sub-tab
Step 3: Turn on the “Mark as conversion” for desired events(which you want to count as conversions).
That’s it!
Now you can see these conversions in Google Analytics 4 reports: “Reports” → “Engagement” → “Conversions”.
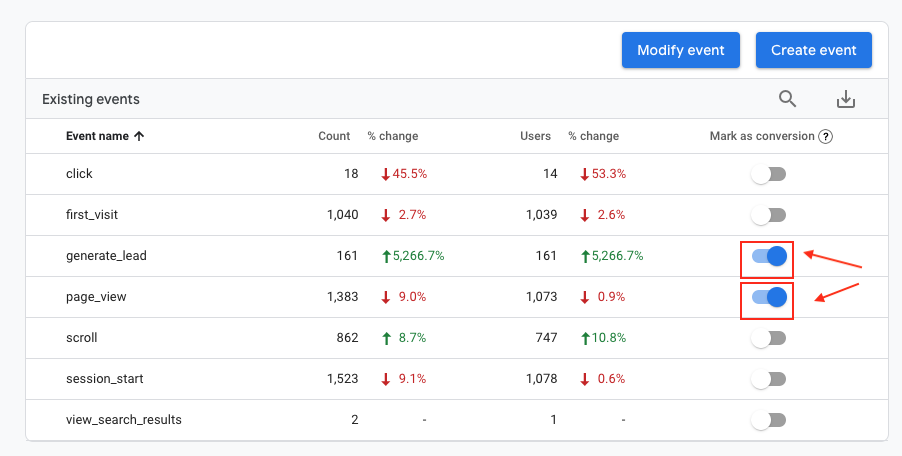
Note: this configuration won’t apply to the historical data – only the event hits collected after you marked them as conversion!
Example 2: creating custom events(from existing) and marking them as Conversions
Of course, you may need to use some advanced conditions for the events.
For example, thank-you-page views in case of online sales, or submissions of certain website forms, or clicks to email links in the footer.
Let’s say we want to track Contact Page(/contact/) views as Conversion.
For doing that, you need to:
- Create a custom event from existing GA4 event and
- Mark it as a conversion.
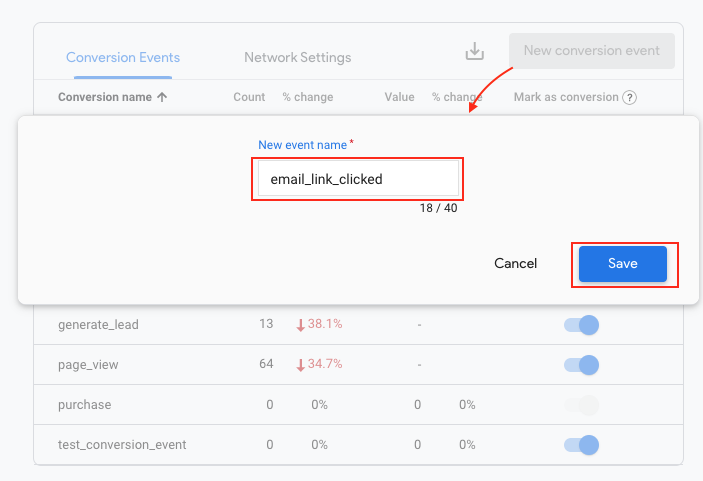
Step 1: Click the “Configure” at the left menu in Google Analytics 4
Step 2: Click on the “Events”
Step 3: Click the “Create Event” button
The new popup with customization settings will open.
Step 4: Give a name for the new event, for instance, contact_page_viewed
Step 5: Add the first condition: [ event_name ] [ equals ][ page_view ]
Step 6: Add the second condition: [ page_location ] [ contains ] [ contact ]
Step 7: Click “Save”
Step 8: Track the event(visit the page in our case), then go to “Configure” → “Events” and mark the contact_page_viewed event as conversion. And check the Example 3 below.

Example 3: creating conversions in advance
Marking events as conversions is convenient when you already have the events in your reports.
But in some cases you don’t have this option:
- You can’t wait until the event appears in reports(there are still some delays in GA4 after the event is tracked and appeared in the “Configure” menu OR
- You need to set up one or many events as conversions in advance
(Like you did in Universal Analytics).
As an alternative, you can add the event in the “Configure” → “Conversions” sections.
Step 1: Click the “Configure” at the left menu in Google Analytics 4.
Step 2: Click on the “Conversions”.
Step 3: Click the “New conversion event” button.
Step 4: paste the name of the existing event OR event that you are planning to send in the future(for example, using Google Tag Manager).
Step 5: click the “Save” button.
The event will appear on the “Conversions” table with “Mark as conversion” enabled.
You can use this approach in combination with:
- Google Analytics 4 events tracking using JavaScript;
- GA4 events tracking using Google Tag Manager;
- Custom events from 3rd-party apps/plugins.
Where to find conversions in Google Analytics 4 reports
In the left menu of Google Analytics 4, click “Reports” → ”Engagement” → “Conversions”.
In this report, you will see the data for all conversions that were collected for the period:

Where is the Conversion Rate metric in Google Analytics 4?
Conversion Rate – is one of the most important metrics that shows the performance of your website, different traffic sources, periods, goal.
Definition from Google: Conversion Rate – is the Percentage of sessions resulting in a conversion to the requested goal number.
The problem with Google Analytics 4 is… that you don’t have this metric in reports. At least now(in September 2021).
I hope the situation will change in the future, but now you can use Google Data Studio.
Step 1: create a new Google Data Studio report.
Step 2: add your Google Analytics 4 property as the data source.
Step 3: Click “Insert” → “Scorecard”(scorecard #1).
Step 4: Click on scorecard #1 and change the metric(right column) to “Conversions”
Step 5: In scorecard #1 settings, click “Add a filter”.
Create a filter with the condition: [Include][Event name][…insert your event name here…].
Save the filter.
In the example below, I used the blog_page_viewed conversion in the filter:

Note: don’t be afraid of using “Event name” here, as in Google Analytics 4 this will be the same as “Conversion Name”(at least for now).
Step 6: Click “Insert” → “Scorecard”(scorecard #2).
Step 7: Click on scorecard #2 and change the metric(right column) to “Sessions”.
Step 8: Select both scorecards → Right-click → Blend data.
Step 9: you will get the new scorecard with Conversion Rate for selected Google Analytics 4 conversion:

Enjoy!
And feel free to rename this blended metric to avoid confusion, especially if you’ll do that for several goals.
Limits in conversions tracking in Google Analytics 4
Google Analytics has data collection and configuration limits.
Below are limits, related to conversions:
| Maximum event length name | 40 characters |
| The maximum number of Conversions in Google Analytics 4 property | 30 conversions* |
*If you will reach the limit of 30 conversions, you can delete some of the old and/or useless conversions from the property.
Anyway, be smart and set up only events meaningful for your business as conversions. This approach allows you to keep the data that you really need in Google Analytics 4 reports.
Conclusion
Google Analytics 4 has “Conversions” – which is analog of “Goals” in previous versions of GA.
You can use only events as the base for conversion, but unfortunately don’t have a Conversion Rate metric(at least for now).
But you can use Google Data Studio(or another BI tool) to calculate the CR.
So things are a little bit complicated compared to Universal Analytics, but I believe that situation will change(as Google Analytics 4 updates all the time).
Leave a Reply